Twin Types with Twin Designer
Define a twin type for a complex piece of equipment (points, events, protocol mapping, and source), test it in the simulator, and publish its version.
برنامهٔ مستقل «ARG Twin Designer» ← «کتابخانهٔ نوعها»؛ در سامانه: «مدیریت انرژی» ← «مدیریت UPS» ← «دوقلوی دیجیتال» — برنامهٔ مستقل «ARG Twin Designer» ← «کتابخانهٔ نوعها»؛ در سامانه: «مدیریت انرژی» ← «مدیریت UPS» ← «دوقلوی دیجیتال» — برنامهٔ مستقل «ARG Twin Designer» ← «کتابخانهٔ نوعها»؛ در سامانه: «مدیریت انرژی» ← «مدیریت UPS» ← «دوقلوی دیجیتال» — The standalone "ARG Twin Designer" application → "Type Library"; in the product: Energy Management → UPS Management → Digital Twin
A piece of equipment such as a chiller, pump, air handling unit, or UPS needs dozens of points, several alarms, and a protocol mapping. Instead of defining these repeatedly for every device, a "twin type" is defined once, and every device of that model follows it. This work happens in ARG Twin Designer: a separate engineering application, with an English interface, that runs on the engineering workstation and is not part of the product's menu. In this lesson you learn this tool's layout and the process of defining, testing, and releasing a type.
Get to know the screen
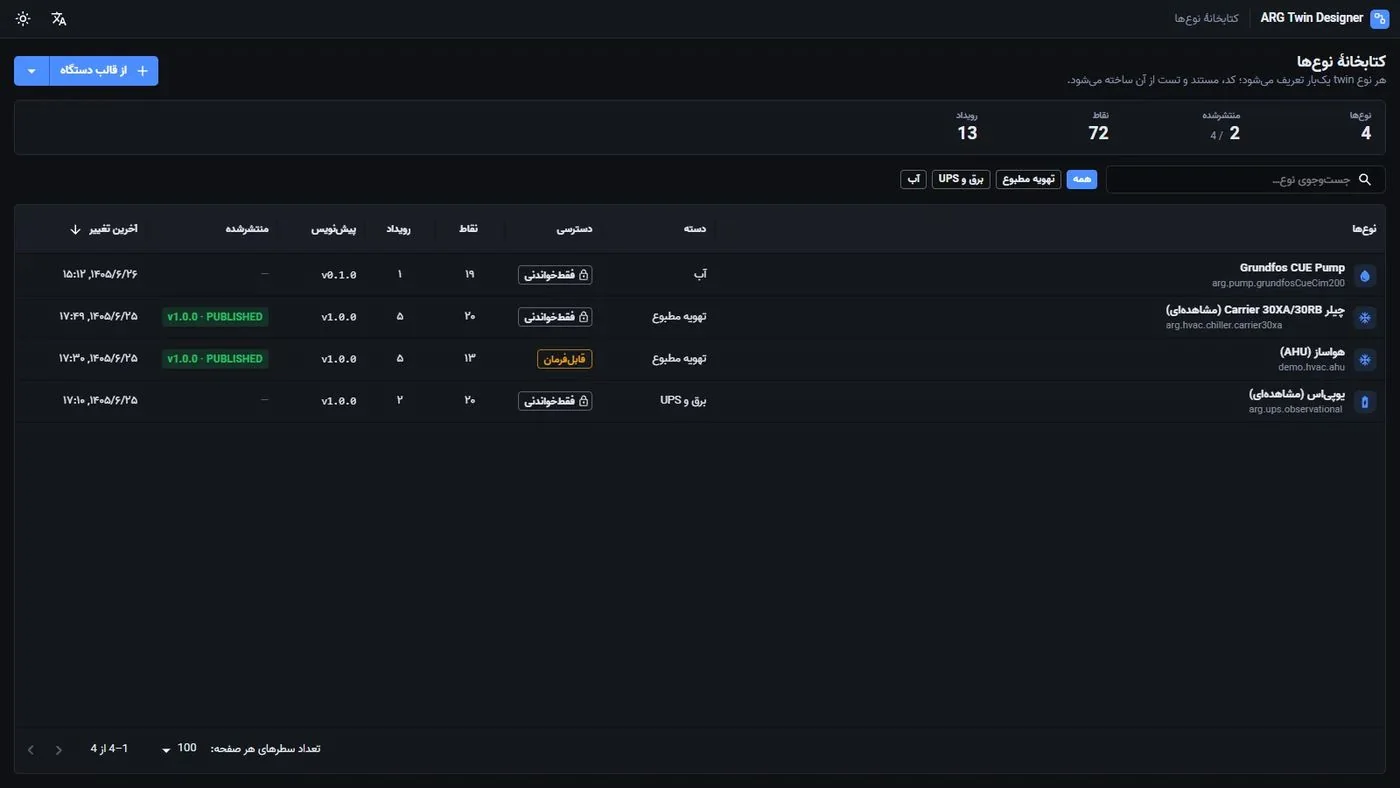
The first screen is the کتابخانهٔ نوعها (Type Library), with the note: "Each twin type is defined once; code, docs, and tests are generated from it."
| Section | Purpose |
|---|---|
| از قالب دستگاه (From Device Template) (split button) | Create a new type from a ready-made template, or as a نوع خالی (Blank Type) |
| Indicators | نوعها (Types), منتشرشده (Published), نقاط (Points), رویداد (Events) |
| Search and category chips | جستوجوی نوع… (Search type...); categories such as HVAC, power and UPS, water |
| Table | Columns for دسته (Category), دسترسی (Access) (read-only or commandable), نقاط, رویداد, پیشنویس (Draft), منتشرشده, and آخرین تغییر (Last Modified) |
Opening a type opens its workspace. At the top are the ذخیره (Save) button (Ctrl+S), undo and redo, draft and published version chips, a validity button (معتبر (Valid) or "n issues"), and انتشار نسخه (Publish Version). Beside them sit the ساختار مدل (Model Structure) tree and the مشخصات (Specifications) panel. The workspace has eight tabs:
| Tab | Purpose |
|---|---|
| نمودار مدل (Model Diagram) | An overview of the type and how points, events, and mappings relate |
| نقاط داده (Data Points) | A list of properties with group, key, English and localized label, data type, unit, scale, access, and address |
| رویدادها و هشدارها (Events and Alarms) | Conditions of the form "if point operator value → severity" |
| نگاشت پروتکل (Protocol Mapping) | Each point's address in the protocol — Modbus, BACnet, SNMP, or MQTT — with an "n / m mapped" coverage bar |
| منبع و هویت (Source and Identity) | Observation time, staleness timeout, source-type detection, and identity fields |
| شبیهساز زنده (Live Simulator) | Running the type against simulated data across several scenarios |
| کد تولیدی (Generated Code) | The files generated from the type definition: code, tests, bilingual documentation, and the type file |
| نسخه و انتشار (Version and Release) | Version publishing, compatibility checks, and the version lifecycle |
Step by step
- Create the type from a template. In the کتابخانهٔ نوعها click از قالب دستگاه. In the تعریف نوع جدید (Define New Type) dialog, pick one from the templates table and review the رجیسترهای قالب (Template Registers) preview (key, English label, address, data type, scale, unit, and whether it is writable). About 25 ready-made Modbus templates exist, including an energy meter, chiller, CRAC, UPS, variable-frequency drive, generator, and weather station. For equipment with no template, use the نوع خالی tab.
- Enter the type's identity. Fill in برچسب فارسی (Local Label), برچسب انگلیسی (English Label), برچسب موجودیت (Entity Label), فضای نام (Namespace), and کلید (Key). For equipment that is only monitored, leave فقطخواندنی (Read-only) on. Then click ایجاد (Create). The نقاط داده tab opens; an "Online" point, an offline event, a Modbus source, and a 120-second staleness timeout are generated automatically.
- Complete the points. In نقاط داده, translate each point's local label; it is initially filled from the template's English description. Check the واحد (Unit), ضریب (scale) (Scale) (e.g. ×0.1 so a raw value of 72 becomes 7.2), and, if needed, the minimum and maximum. Every cell is edited with a double-click or Enter. افزودن ویژگی (Add Property) creates a new point. The data type is one of number, integer, boolean, string, or enum, and دسترسی is either "read-only" or "write with policy".
- Define events and alarms. In the رویدادها و هشدارها tab, click افزودن رویداد (Add Event) and set the نقطه (Point), عملگر (Operator) (=, ≠, >, ≥, <, ≤), مقدار (Value), and شدت (Severity) (اطلاع (Info), هشدار (Warning), آلارم (Alarm), بحرانی (Critical)). Example: discharge pressure greater than 20 bar → Alarm. Review the "if … → …" sentence in the specifications panel.
- Complete the protocol mapping. In نگاشت پروتکل, give each point an address. The address format depends on the protocol: in Modbus, for example
IR:100orHR:210; in BACnet, for exampleAI:1; in SNMP an OID; and in MQTT a topic. Rows without an address show "not mapped". The goal is to bring the coverage bar to full. - Configure the source. In منبع و هویت, set کهنهشدن پس از (Stale after) (between 5 and 1800 seconds) and the فیلدهای هویت (Identity fields). If no data arrives within this period, its quality is reported as stale.
- Save and validate. Click ذخیره. The validity button should read معتبر. If it shows "n issues", click it and fix them. Validation messages are in English, for example a duplicate key, a minimum greater than a maximum, or a writable point in a read-only type.
- Test in the simulator. In شبیهساز زنده click اجرا (Run). Change the سناریو (Scenario) from عملکرد عادی (Normal operation) to شرایط آلارم (Alarm condition) and watch the event fire in the رویدادنگار (Event Log). Then try قطع ارتباط (Disconnected), خرابی سنسور (Sensor fault), and خطای دریافت داده (Data receive error), and follow the data-quality change (GOOD, STALE, UNKNOWN, BAD). Up to six points can be shown on the chart at once, and سرعت (Speed) can be set to ×0.5, ×1, or ×2.5.
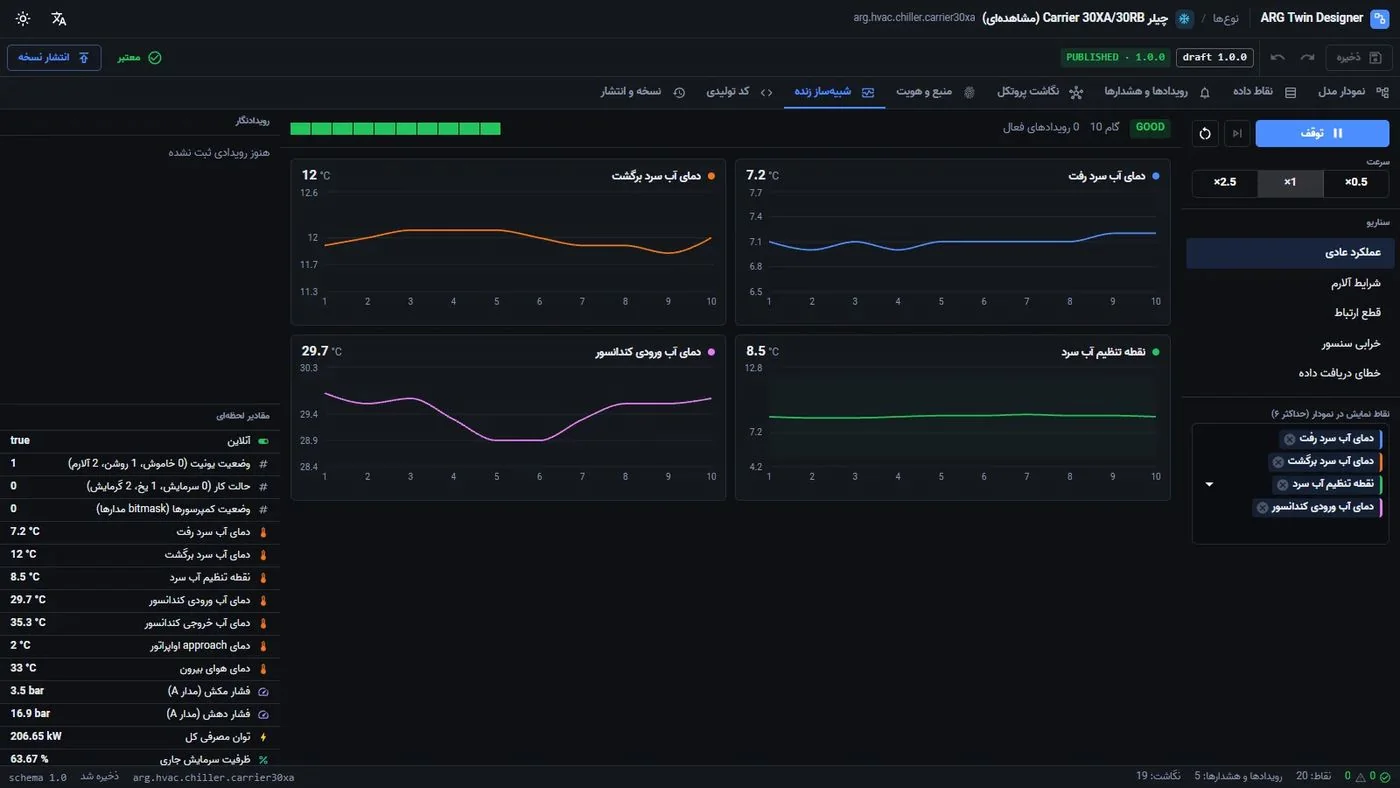
Live Simulator · the "Normal operation" scenario with GOOD quality, a four-point chart, and live values at the bottom - Publish a version. In نسخه و انتشار, read the سازگاری با آخرین انتشار (Compatibility with Latest Release) panel; it states what kind of version bump is required (MAJOR, MINOR, PATCH, or NONE). Set نسخه (Version) accordingly, or click استفاده از پیشنهاد (Use suggestion), enter the منتشرکننده (Publisher) name, and click انتشار نسخه. A published version is immutable and carries a checksum.
- Retrieve the code. In کد تولیدی, get the files with دانلود (Download) or نوشتن در پوشهٔ out (Write to out folder). Adding these files to the product is a manual step for the development team; there is no automatic installation.
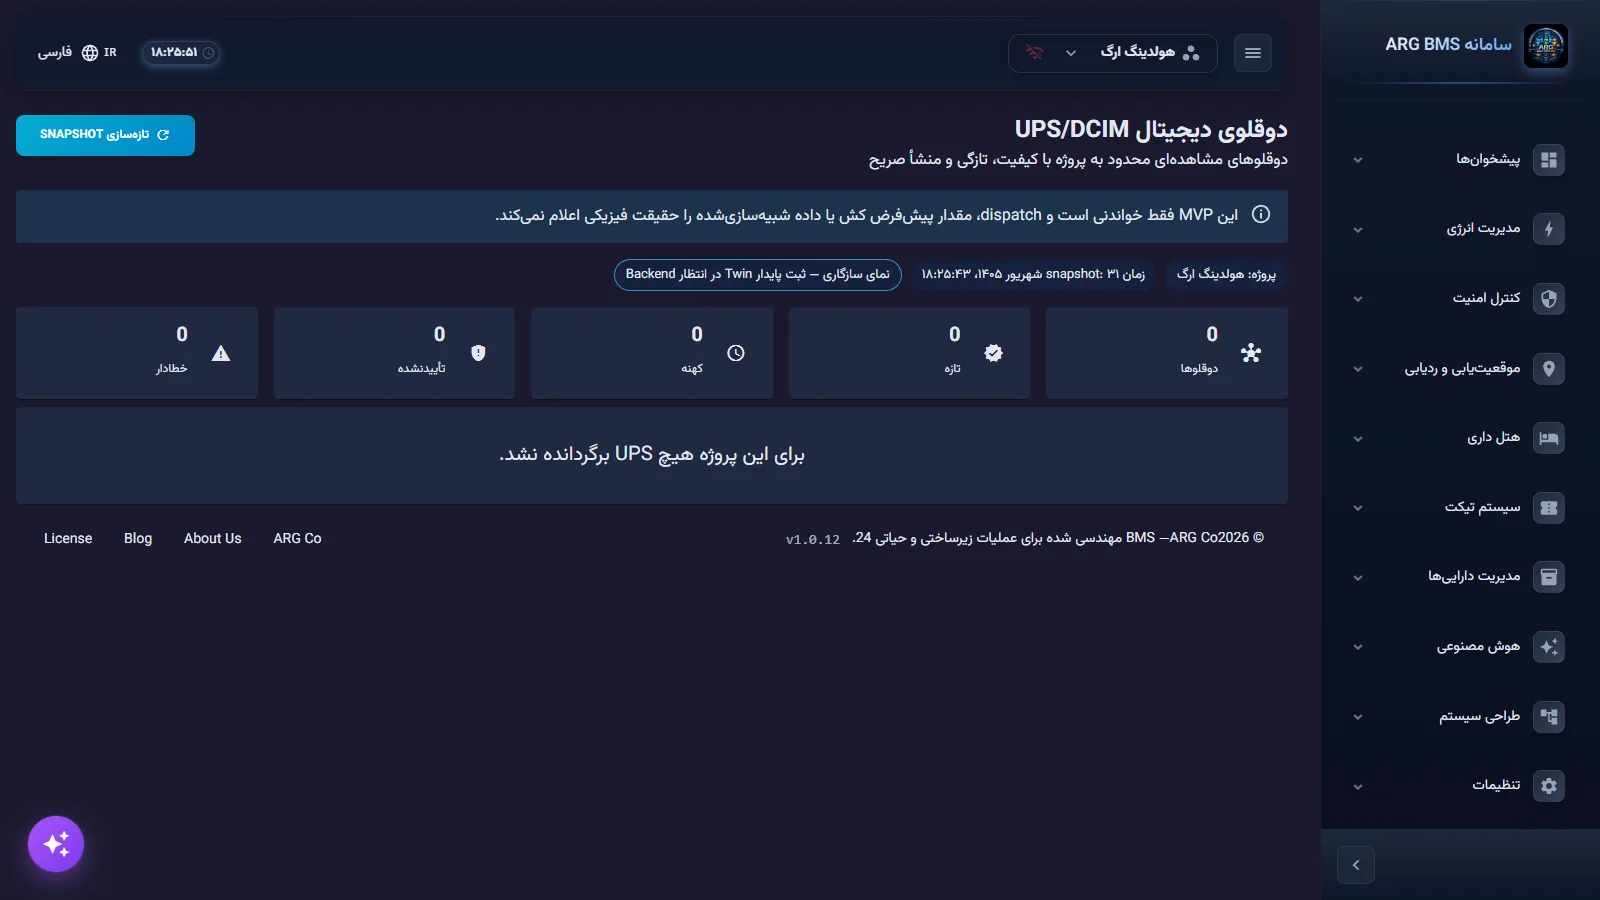
Once deployed, devices of that type appear inside the product itself, on pages such as «مدیریت انرژی» ← «مدیریت UPS» ← «دوقلوی دیجیتال» (Energy Management → UPS Management → Digital Twin). Each instance shows its هویت دوقلو (Twin Identity), نسخه نوع Twin (Twin Type Version), source, and data class.
Tips and common mistakes
- The "Publish Version" button is enabled only once changes are saved, the type is valid, "Publisher" is filled in, and the version has been bumped enough.
- The "Generated Code" tab stays disabled while an unsaved change exists.
- The operators >, ≥, <, and ≤ are valid only for numeric points.
- A read-only type cannot contain a writable point.
- In the current version, Twin Designer has no tab for defining commands, and generated types do not send commands; configure equipment control from dashboards (lessons B9 and B10).
- Sub-components (such as a UPS's batteries) are edited from the "Model Structure" tree, not with an add button.
Summary
- Twin Designer is a separate engineering application that defines each equipment type once.
- A type definition includes data points, events and alarms, protocol mapping, and source and identity.
- The Live Simulator runs normal, alarm, disconnected, sensor-fault, and receive-error scenarios.
- A published version is immutable, and the tool itself determines whether a MAJOR, MINOR, or PATCH bump is required.
- The development team adds the generated code to the product; the result appears on pages such as the UPS "Digital Twin".
Hands-on exercise on the live demo
Twin Designer runs on the engineering workstation and is not available on the public demo. Do this exercise on the demo itself (bms.argsrv.com, project "ARG Holding") by observation only; do not change anything.
- Open «مدیریت انرژی» ← «مدیریت UPS» ← «دوقلوی دیجیتال».
- In نمونههای Twin (Twin Instances), select a UPS.
- Under هویت دوقلو, note the نسخه نوع Twin, source, and data class.
- For each one, explain which tab of the type definition in Twin Designer it comes from (for example, the source comes from "Source and Identity", the version from "Version and Release").
- If Twin Designer is installed in the classroom: build a type from an energy-meter Modbus template, define a "Warning" event for a voltage greater than 250, run the "Alarm condition" scenario in the simulator, and read the "Compatibility with Latest Release" panel.
Lesson check
Answer at least 3 of 4 correctly to pass.
- 1. In which tab is the condition "if discharge pressure > 20 bar → Alarm" defined?
- 2. Deleting a point from a type that has already been published requires which version bump?
- 3. Which scenario does not exist in the "Live Simulator"?
- 4. When is the "Publish Version" button enabled?