Security and Hardening
Learn the digital twin's security layers (roles, key level, account locking, password confirmation before a command, the assistant confirmation card, the TLS gateway) and run a post-installation hardening checklist.
«تنظیمات» ← «کاربران و دسترسیها» ← «حسابهای کاربری»؛ «تنظیمات» ← «تنظیمات پروژه» ← «امنیت کاربر»؛ کنسول سرور ← «System Design» ← «Projects» و «Settings» ← Security؛ دروازهٔ وب (IIS یا مشابه) — «تنظیمات» ← «کاربران و دسترسیها» ← «حسابهای کاربری»؛ «تنظیمات» ← «تنظیمات پروژه» ← «امنیت کاربر»؛ کنسول سرور ← «System Design» ← «Projects» و «Settings» ← Security؛ دروازهٔ وب (IIS یا مشابه) — «تنظیمات» ← «کاربران و دسترسیها» ← «حسابهای کاربری»؛ «تنظیمات» ← «تنظیمات پروژه» ← «امنیت کاربر»؛ کنسول سرور ← «System Design» ← «Projects» و «Settings» ← Security؛ دروازهٔ وب (IIS یا مشابه) — Settings → Users and Access → User Accounts; Settings → Project Settings → User Security; server console → System Design → Projects and Settings → Security; the web gateway (IIS or similar)
Digital twin security is built from several layers: a web gateway with TLS, a user account with automatic locking, a project key with an access level, a second password confirmation before commanding equipment, and explicit user confirmation for every assistant change. This lesson introduces each layer and gives a practical post-installation hardening checklist.
Controls built into the product
| Layer | What it does | Where it is configured |
|---|---|---|
| Account and role | Only an active, unlocked account can log in; 5 failed logins lock the account; roles determine page and dashboard visibility | حسابهای کاربری (User Accounts), نقشها (Roles) (lesson C1) |
| Project key level | Allows or rejects writes, equipment commands, and admin operations on the server | Console → API Key Management (lesson C2) |
| Password confirmation before a command | Before sending a command from a dashboard, the "Confirm Command" window asks for the password again; after confirmation, commands can be sent for up to 60 seconds without asking again | Automatic in 2D and 3D dashboards |
| Command receipt | Each command gets a unique ID, runs only once, and its steps are logged | Automatic |
| Assistant confirmation card | Every assistant change is only a suggestion until that same user clicks تأیید (Confirm); an unconfirmed suggestion expires after 30 minutes | The assistant panel |
| Session and token | The web app's login token is valid for 12 hours; the console's session is set by "Session Timeout (s)" | Console → Settings → Security |
| TLS gateway | HTTPS and WSS terminate at the web gateway (reverse proxy) | IIS or a similar gateway (lesson C5) |
Step by step: post-installation hardening checklist
- TLS at the gateway. Enable HTTPS with a valid certificate at the web gateway, and redirect every http request to https. Do not expose the server or the database directly to the outside network.
- Session cookie and allowed origin. On an HTTPS site, keep
server.servlet.session.cookie.securetrue, and setargbms.websocket.allowed-originsexactly to the site's public address (a value of "*" is not accepted). - Network. Keep the database and the server's direct port reachable only on the internal network; only the gateway faces outward. Do not turn on legacy TCP ports that are off by default unless you have no choice.
- Headers and limits at the gateway. Apply security headers such as HSTS and Content-Security-Policy, and rate-limiting, at the gateway. If not needed, close the API documentation page to outside access, and configure production error messages without technical detail.
- Accounts. Change default passwords right after installation and require long, unique passwords. قفل کردن (Lock) unused accounts and غیرفعال (Deactivate) people who have left. Grant "system access" (console login) only to trusted administrators.
- Roles. Create a separate role for each working group, and give each user only the role they need. Avoid "Manager" or "admin" in non-administrative role names.
- Keys. Create a separate key with the lowest level and an expiration date for each external device or system; a genuinely read-only key is User Level 3. Do not hand out the Master key, and Deactivate unused keys. Read the server's admin key from an environment variable when possible, not from a plain-text file.
- Files and backups. Grant write access to the install folder only to the service account. Database backups carry account information; keep them encrypted and access-restricted (lesson C6).
- Periodic review. Monthly, review the account list, locked accounts, keys, and their "Last Used" column, and close off anything not in use.
In practice: commanding equipment
When a user sends a command from a dashboard, the "Confirm Command" window opens with the message "Enter your password to send the command". After entering the رمز عبور (Password) and clicking تایید و ارسال (Confirm and Send), subsequent commands are sent for up to 60 seconds without asking again. If the user's project key does not allow control, the server rejects the command — meaning the final enforcement is still the key level.
The trail commands leave
Every command sent to equipment gets a unique ID and its steps are logged: sent to the edge, accepted by the device, receipt received, and, on error, a failed status. The command's unique key keeps it from running twice — for example, if an impatient user clicks the button twice, or the network delays the response. When investigating an incident, this chain tells you whether the command was even sent, whether it reached the device, or whether the device rejected it. Combined with the 60-second password confirmation, every manual change to equipment carries both a deliberate user action and a technical trail.
Tips and common mistakes
- A wrong password in the "Confirm Command" window also counts toward failed login attempts; five wrong attempts lock the account, and only an administrator can باز کردن قفل (Unlock) it.
- The message "Invalid or expired token" after a server restart is expected; users should log in again.
- Do not take the "User Level 2 (Read Only)" label at face value; grant User Level 3 instead.
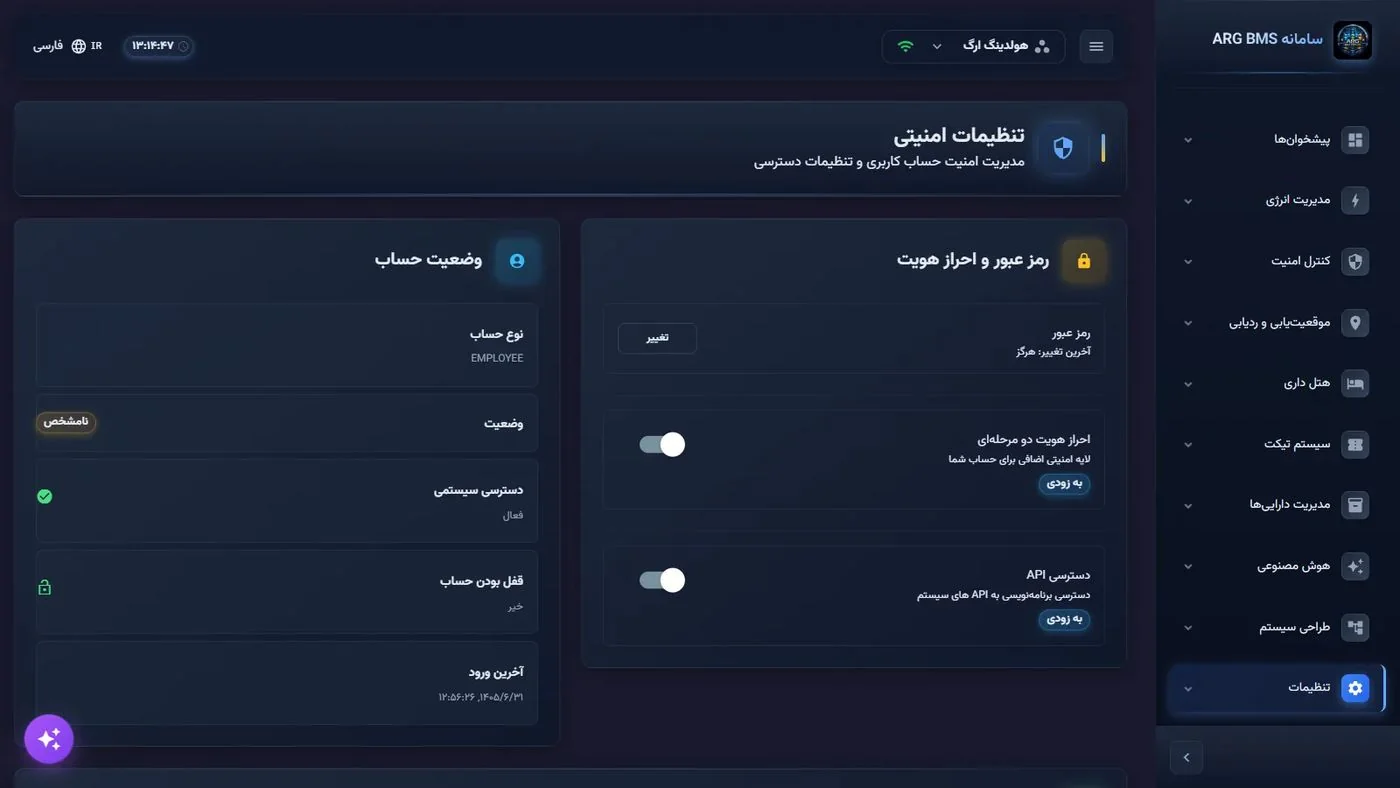
- احراز هویت دو مرحلهای (Two-Factor Authentication) and دسترسی API (API Access) in "Security Settings" are labeled "coming soon" and are not active in this version.
- The "Permissions" page does not currently save; enforce access with accounts, roles, and the key level instead.
Summary
- TLS, security headers, and rate limiting at the gateway; the database and server stay on the internal network only.
- Server-side enforcement is the key level; grant the lowest level each consumer needs.
- Automatic lock after 5 failed attempts; password confirmation before a command, valid for 60 seconds.
- Every assistant change needs that same user's confirmation, and an unconfirmed suggestion expires after 30 minutes.
Hands-on exercise on the live demo
On the public demo (bms.argsrv.com, project "ARG Holding"), do not fully send any command and do not confirm any change.
- Open a 2D dashboard with a switch or slider and issue a command; see the "Confirm Command" window and the 60-second text, and click انصراف (Cancel). If the demo account has no control key, note the rejection message and match it to the levels table.
- Open the assistant and ask it to "build a test floor"; see the confirmation card with تأیید and لغو (Cancel) buttons, and click لغو.
- Open «تنظیمات» ← «تنظیمات پروژه» ← «امنیت کاربر» (Settings → Project Settings → User Security) and read your own account's lock status and last login.
- Write this lesson's hardening checklist as a checklist for a hypothetical site, and note who is responsible for each item (network team, system administrator, deployment team).
Lesson check
Answer at least 3 of 4 correctly to pass.
- 1. After how many failed attempts does a web app user's account lock automatically?
- 2. After entering the password in the "Confirm Command" window, how long can subsequent commands be sent without asking again?
- 3. Where is HTTPS enabled in a digital twin deployment?
- 4. What happens to a change the assistant logged that no one confirmed?